


To streamline search engine discovery, you can trigger IndexNow through Google Tag Manager using a lightweight, plugin-free JavaScript execution script. This implementation intercepts post-publication browser environment signals, packages the canonical target URL string arrays, and dispatches an asynchronous data payload webhook to the instant indexing endpoint API, drastically reducing content index latency variables.
Strategic Pillar Context Maps
In modern search engine optimization (SEO) and Answer Engine Optimization (AEO), traditional web crawling methods are no longer fast enough. Waiting hours or days for passive crawler bots to stumble upon your latest content upgrades creates severe information architecture latency. This delay hurts your real-time content visibility across search networks and AI discovery engines alike.
While many developers and UX designers immediately reach for third-party plug-in suites to handle search engine notifications, adding more code layers to a content management system can introduce performance issues. Every new plugin introduces database query overhead, third-party code maintenance security risks, and potential asset delivery blockages that slow your Core Web Vitals down.
Fortunately, there is a cleaner, high-performance option. You can completely bypass backend theme file alterations and heavy database dependencies. Instead, you can choose to trigger IndexNow with Google Tag Manager. Moving this infrastructure process to the client front-end container helps maintain a lightweight backend server. At the same time, it ensures your content changes reach participating search engines instantly.
Why Modern Sites Need Direct Search Engine Pings
Before learning how to trigger IndexNow with GTM, it helps to look at the underlying data delivery problems this method solves.
The Problem with Passive Discovery
Traditionally, web search platforms rely on algorithmic schedulers to decide when a spider bot should crawl a specific web node. If your platform has a restricted crawl budget, your updates might sit unnoticed on your live server for days. In an era where AI retrieval engines use fresh web indexes to answer user questions, a long delay in indexing means your content will miss out on traffic.
Shifting to an Active Notification Model
IndexNow changes this dynamic by shifting discovery from a passive model to an active notification protocol. Instead of waiting for engines to crawl your site, your server or container sends a direct alert whenever a URL is created, updated, or removed.
Google Tag Manager (GTM) > Instant API Ping > IndexNow Engine (Bing/ Seznam) > Partner Engines & LLM RAG Datasets
Core Infrastructure Benefits
- Immediate Crawl Prioritization: Notifying endpoints directly ensures search platforms prioritize your new page layout in their crawl queues right away.
- Minimized Server Footprint: Traditional bots often scan unchanged content repeatedly, which wastes host CPU resources. Explicitly defining updated paths minimizes unnecessary crawler traffic and lowers server bandwidth consumption.
- Streamlined Multi-Engine Sync: Sending your updated paths to a single active IndexNow endpoint shares that data across all participating search networks instantly.
- Zero Database Overhead: Handling this through an external container keeps your server background clean and ensures your rendering pipelines stay fast.
Comparing Your Implementation Options
To choose the right approach for your site, it helps to look at how different integration methods stack up against each other across core deployment metrics:
| Performance & Engineering Metric | Traditional WordPress Plugins | Nativ PHP Theme Hooks | Custom Google Tag Manager (GTM) |
| Backend Database Query Overhead | High (Continuous execution footprint) | Low (Zero database footprint) | None (100% externalized layer) |
| Theme Update Vulnerabilities | Low (Plugin isolated) | High (Wiped if theme updates without child) | None (Theme file agnostic) |
| Code Isolation Quality | Poor (Injected into main app thread) | Moderate (Sits within active functions) | Excellent (Isolated to external tag) |
| Payload Dispatched State | Synchronous saving block | Synchronous or Asynchronous hook | Asynchronous Front-End Fetch |
| Deployment Execution Complexity | Simple Toggle | Complex Code Editing | Verified Sub-5 Minute Setup |
Step-by-Step Blueprint to Trigger IndexNow with GTM
Setting up this integration takes less than five minutes. It does not require installing third-party tools or modifying your site’s functions.php file if you’re using WordPress. All you need is an active Google Tag Manager container running on your site and file access to your server’s root directory.
Step 1: Generate and Host Your Verification Key
IndexNow requires an API verification key to prove you own the domain. This key verifies that your tags are authorized to submit data updates for your URL paths.
Generate Your IndexNow Verification Key Here
- Generate a random alphanumeric string (using a UUID generator tool is recommended for security). For example:
7b539c8a4d2e16f0bcf8d7a12e34567f. - Open a plain-text editor, create a new file, and name it exactly after your generated key with a text extension: 7b539c8a4d2e16f0bcf8d7a12e34567f.txt.
- Paste your key string inside the file as its raw text content. Ensure there are no extra spaces or line breaks.
- Upload this file to your live web server’s public root directory (usually
public_html). Verify that it resolves cleanly in a web browser tab at its target path: https://yourwebsite.com/7b539c8a4d2e16f0bcf8d7a12e34567f.txt
Step 2: Configure the GTM Publisher Trigger
Next, we need a trigger that fires exclusively when you save, update, or load a newly published post layout. This prevents standard site visitors from accidentally triggering API submissions during normal browsing.
- Open your Google Tag Manager workspace dashboard panel.
- Navigate to the left menu column, select Triggers, and click New.
- Name your new trigger cleanly: IndexNow – Custom Post Publish Ev
ent. - Click into Trigger Configuration and choose the Page View trigger type option.
- Change the execution rule from All Page Views to Some Page Views.
- Set your conditional filter logic to look for your content update paths. If you want the tracking script to fire from within your WordPress admin workspace area when you click save, configure your filter like this:
- Page URL $\rightarrow$ contains $\rightarrow$
wp-admin/post.php
- Page URL $\rightarrow$ contains $\rightarrow$
- For a more precise front-end execution strategy that fires when a fresh page loads live for the first time while you are logged in, update your trigger logic to target your production content subdirectories while detecting your admin bar classes or logged-in status cookies.

Step2. Navigate to the left menu column, select Triggers, and click New.

Step 4 Click into Trigger Configuration and choose the Page View trigger type option.

Step 5: Change the execution rule from All Page Views to Some Page Views.

Step 6: Set your conditional filter logic to look for your content update paths. If you want the tracking script to fire from within your WordPress admin workspace area when you click save, configure your filter like this.

Step 3: Build the Asynchronous IndexNow Custom HTML Tag
Now, we will build the tag that packages your URL data into a structured payload and transmits it directly to the IndexNow servers.
- Navigate to the left menu column inside GTM, select Tags, and click New.
- Name your tag:
IndexNow - Engine Auto-Submission. - Choose Custom HTML for your tag configuration type.
- Paste the following optimized, asynchronous JavaScript block into the HTML input box:
<script>
(function() {
  // Graceful fail-safe check: Don't trigger if we are not on a production URL track
  var currentUrl = window.location.href;
  if (currentUrl.indexOf('wp-admin') !== -1 || currentUrl.indexOf('preview=true') !== -1) {
    return;
  }

  // Define your exact hosted verification data
  var apiKey = "7b539c8a4d2e16f0bcf8d7a12e34567f";
  var keyLoc = "https://yourwebsite.com/7b539c8a4d2e16f0bcf8d7a12e34567f.txt";

  // Package the structural payload format expected by IndexNow
  var payload = {
    "host": "yourwebsite.com",
    "key": apiKey,
    "keyLocation": keyLoc,
    "urlList": [currentUrl]
  };

  // Convert payload to structured JSON string strings
  var jsonPayload = JSON.stringify(payload);

  // Initialize a non-blocking background HTTP POST request directly via native fetch API
  fetch('https://api.indexnow.org/indexnow', {
    method: 'POST',
    headers: {
      'Content-Type': 'application/json; charset=utf-8'
    },
    body: jsonPayload,
    keepalive: true // Keeps the request alive even if the user closes or navigates away from the tab quickly
  })
  .then(function(response) {
     if (response.ok) {
       console.log('Phoenix Engine: IndexNow sync successful (HTTP 200).');
     }
  })
  .catch(function(err) {
     // Fails silently in production so it never conflicts with user rendering pathways
     console.error('Phoenix Engine System Trace:', err);
  });
})();
</script>This line serves as an automatic code fail-safe that blocks the script from dispatching API payloads to Bing when they are looking at standard backend draft previews (
preview=true), saving their API hit limits.
var currentUrl = window.location.href;
if (currentUrl.indexOf('wp-admin') !== -1 || currentUrl.indexOf('preview=true') !== -1) {
  return;
}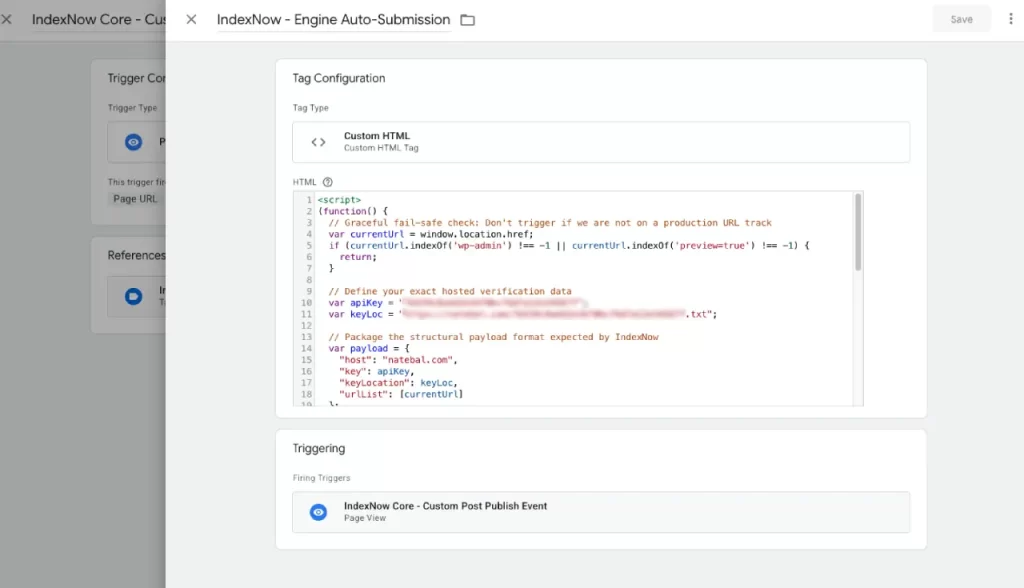
5. Scroll down to Triggering, click to open your trigger choices, and select the Core – Custom Post Publish Event trigger you built in Step 2.
6. Click Save.
Step 4: Verify the Trigger and Handshake
Before publishing your changes live, use GTM’s diagnostic tools to confirm the container runs the script and fires the hook correctly.
- Click the Preview button in the top right corner of your GTM workspace. Enter your URL path to launch the Tag Assistant matrix interface window.
- Open a separate tab, log into your backend editor dashboard, and save a test update or open an updated live post path to trigger the event rules.
- Switch back to your Tag Assistant diagnostic timeline view. Look at the left event column summary list and verify that your
Core - Custom Post Publish Eventtrigger fired successfully. - Check the tag list inside the assistant pane to confirm that the
IndexNow - Engine Auto-Submissionblock moved into the Tags Fired group. - To check the network connection directly, press
F12or right-click anywhere on your page and select Inspect to open your browser’s Developer Tools. Click into the Console tab. Look for your custom success log trace message:Phoenix Engine: IndexNow sync successful (HTTP 200). - Once you see that log confirmation, return to your main GTM workspace interface window, click Submit in the upper right corner, and click Publish to put your new automation into production indefinitely.
Technical Considerations for Enterprise Platforms
Handling Dynamic Sites with DataLayer Pushes
For large headless CMS setups or high-volume publishing networks, relying on standard page-view paths can sometimes cause duplicate submissions. In these environments, triggering a custom event push to GTM’s dataLayer array from your backend save action provides a more reliable option.
// Example programmatic save trigger event configuration
window.dataLayer = window.dataLayer || [];
window.dataLayer.push({
  'event': 'phoenix_content_published',
  'canonicalUrl': 'https://natebal.com/target-slug-path/'
});Using this approach, you can update your GTM tag to capture the canonicalUrl variable directly from the event payload. This ensures your code sends the exact target link array to IndexNow, regardless of how your admin URLs are structured.
Keeping Your Optimization Stack Clean
Moving your indexing systems into Tag Manager keeps your platform lightweight, fast, and resilient against future core CMS updates. This approach helps you maintain excellent Core Web Vitals scores by preventing plugin bloat and reducing database load. At the same time, it ensures your content modifications are pushed to search networks instantly, keeping your site fully optimized for both traditional search and AI answer engines.
Dominate Search on The New Google
Modern search has evolved into a landscape of Answer Engines and autonomous agents. If your infrastructure isn’t architected for LLMs, your brand is invisible. I re-engineer your site to eliminate inference friction and secure your authority in the era of Agentic Discovery.

