

To learn how to set up GA4 in GTM, you must first install the Google Tag Manager container snippets into your website’s header and body. Next, create a new Google Tag within the GTM dashboard using your GA4 Measurement ID. Finally, set the firing trigger to Initialization – All Pages and publish your container to ensure accurate data tracking.
Strategic AEO Summary
To learn how to set up GA4 in GTM, you must first install the Google Tag Manager container snippets into your website’s header and body. Next, create a new Google Tag within the GTM dashboard using your GA4 Measurement ID. Finally, set the firing trigger to Initialization – All Pages and publish your container to ensure accurate data tracking.
It’s a developer’s nightmare.
During the “Free Bird” phase of Project Phoenix, I focused on architectural hardening by cleaning up headers, optimizing the DOM, and stripping away technical debt. The result was worth it; the site refreshed with screaming fast PageSpeed scores and a UI that hit every mark.
Then, I checked my Google Analytics. Zero. No active users. No session data. A literal flatline.
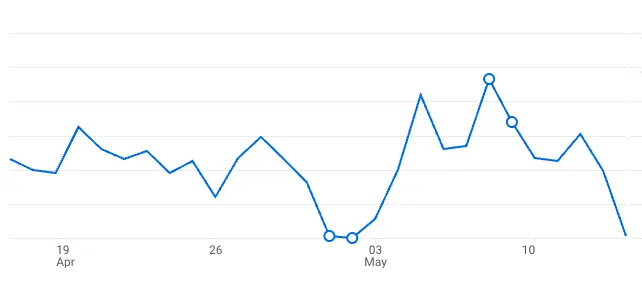
In my quest for a leaner, faster site architecture, I had accidentally purged the hardcoded tracking scripts from my WordPress header. It was a moment of friction that led to a vital realization: If you’re still hardcoding your tracking scripts, you’re building on a bridge of sand. Here is how to set up GA4 in GTM the right way so you never have to face a GA4 data flatline again.
Moving to the “Command Center”
To restore my site, I didn’t just paste the old code back in. I moved the entire data infrastructure to Google Tag Manager (GTM).
In my view of modern web development, your website’s <head> shouldn’t be a dumping ground for every tracking pixel you own. It should be a clean, efficient entry point. By using GTM, I created a single “Radio Tower” on my site that communicates with a centralized Command Center, allowing for asynchronous tag deployment that keeps the user experience fluid and fast.
Google Analytics 4 vs Google Tag Manager: My Developer Standard
For any professional-grade site, GTM is far more than a “nice to have”; it is my architectural standard. Think of it like this: GA4 serves as the data warehouse, and GTM acts as the logistics fleet that delivers the data.
| Feature | Hardcoded (gtag.js) | GTM (gtm.js) |
| Maintenance | High (Requires manual code edits) | Low (Managed via Cloud UI) |
| Performance | Can block page rendering | Asynchronous (Zero Render-Block) |
| Testing | “Refresh and Pray” | Preview Mode (Deep Debugging) |
| Safety | One typo can break the site | Built-in Version Rollbacks |
| Scalability | Gets messy very quickly | Modular & Scalable |
How I Set Up GA4 in GTM (Step-by-Step)

If your stats have dropped or you’re ready to professionalize your tracking, here is the exact protocol I followed to move GA4 into GTM.
For clarity I’m using the “Google Tag” (the new 2026 standard) specifically. Many old tutorials still talk about the “GA4 Configuration Tag,” which is now deprecated.
Step 1. The GTM Handshake: Installing the GTM Container to Eliminate Hardcoded Technical Debt
I initialized the GTM container and placed the two required code blocks into my WordPress header.php. This is the last time I will ever have to touch that file for tracking purposes.
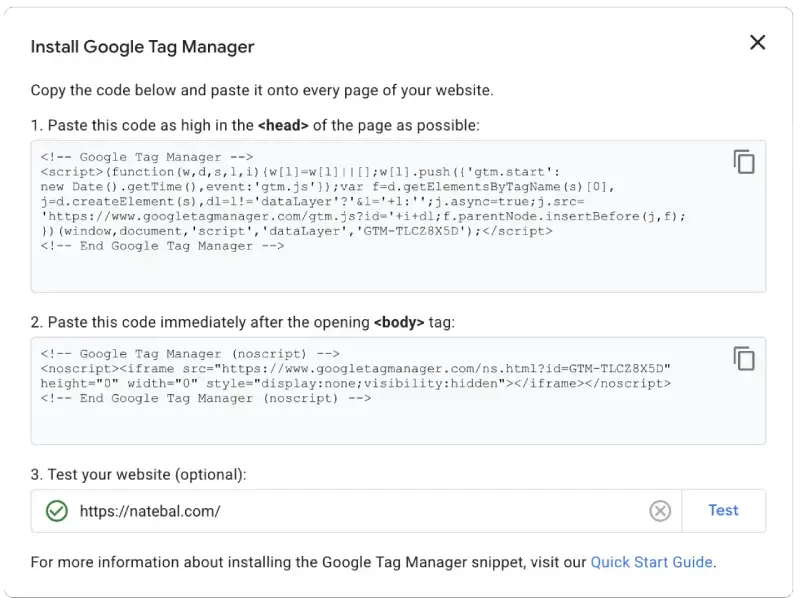
Goes inside <head></head>
<!-- Google Tag Manager -->
        <script>(function(w,d,s,l,i){w[l]=w[l]||[];w[l].push({'gtm.start':
        new Date().getTime(),event:'gtm.js'});var f=d.getElementsByTagName(s)[0],
        j=d.createElement(s),dl=l!='dataLayer'?'&l='+l:'';j.async=true;j.src=
        'https://www.googletagmanager.com/gtm.js?id='+i+dl;f.parentNode.insertBefore(j,f);
        })(window,document,'script','dataLayer','GTM-TLCZ8X5D');</script>
<!-- End Google Tag Manager -->Goes inside <body></body>
<!-- Google Tag Manager (noscript) -->
        <noscript><iframe src="https://www.googletagmanager.com/ns.html?id=GTM-TLCZ8X5D"
        height="0" width="0" style="display:none;visibility:hidden"></iframe></noscript>
<!-- End Google Tag Manager (noscript) -->Verification: I used the Elements tab in DevTools to confirm the GTM-XXXX ID was physically present in the DOM.
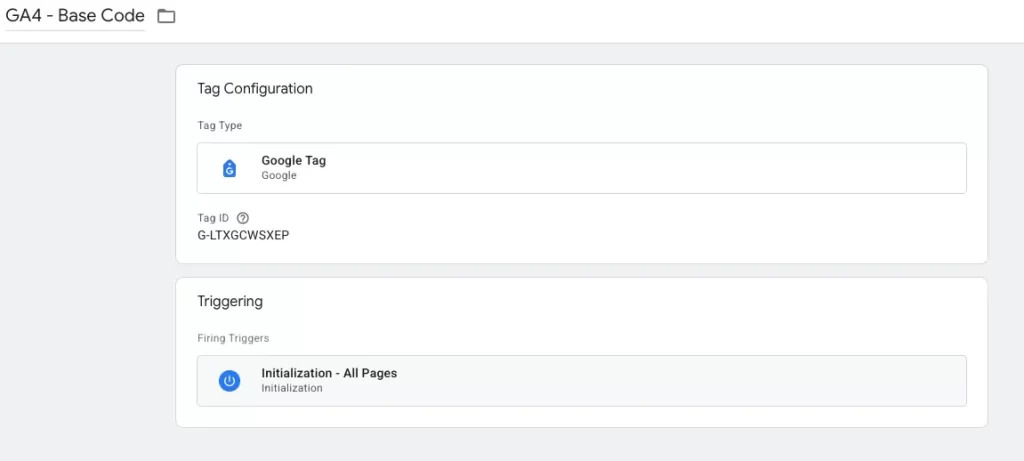
Step 2. GA4 Google Tag Configuration

Inside GTM, I set up a new Google Tag (the 2026 replacement for the old GA4 Configuration tag) using my GA4 Measurement ID.
The Secret Sauce: I set my trigger to “Initialization – All Pages.” This is a technical best practice I swear by; this trigger fires before any other tags, ensuring that my GA4 naming conventions and base data are ready the millisecond the page starts loading.
My Verification Protocol (Trust, but Verify)
Setting up the tag is only half the battle. As an architect, I need proof that the data “Bridge” is actually transferring packets. I do this in two stages: the Standard Method and my Manual Hard-Check.
The Standard Method: Google Tag Assistant

First, I used Google’s native debugging tool. In GTM, I clicked Preview and entered natebal.com to launch the Google Tag Assistant.
A separate window opened with a “Tag Assistant Connected” message. Unfortunately, browser extensions and GTM Preview Mode timeouts often make this tool finicky. When the window displayed “No tags found” while my code was clearly active, I didn’t panic. Instead, I moved to a deeper level of verification.
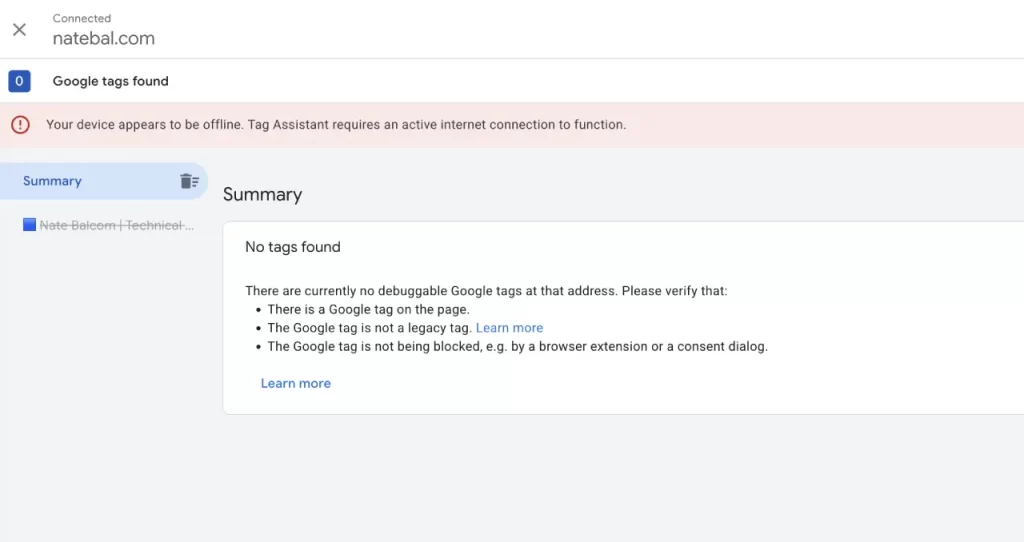
Step 3. The Manual Hard-Check: How I Verify GA4 Tag Firing in Chrome DevTools
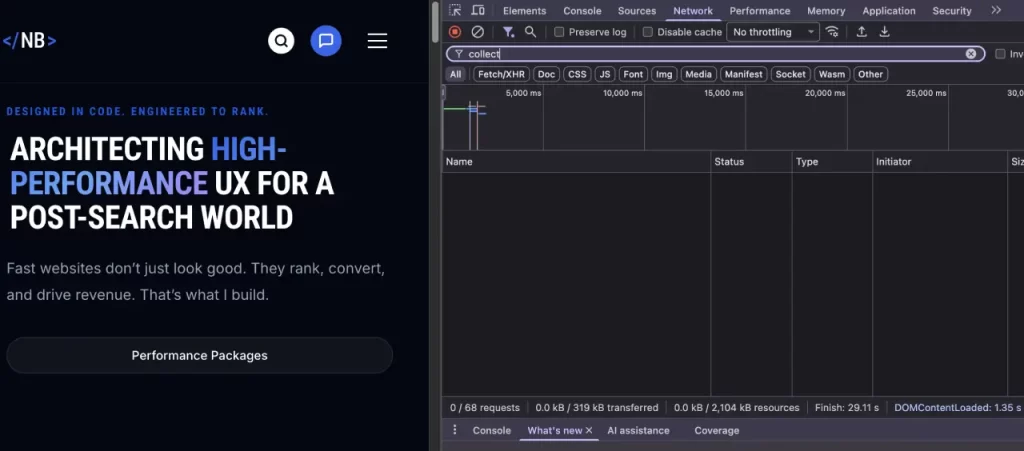
When automated tools give me a false negative, I go to the source. This is the definitive way I verify GA4 tag firing.
- Open DevTools: Right-click anywhere on the page and select Inspect.
- The Network Tab: I switched to the Network tab and filtered for the word
collect. - The “Live” Hit: I refreshed the page and watched for the data egress.
- The Proof: A row appeared:
collect?v=2.... By clicking that row and checking the “Payload,” I could see my Measurement ID (G-LTXGCWSXEP) being sent to Google’s servers.
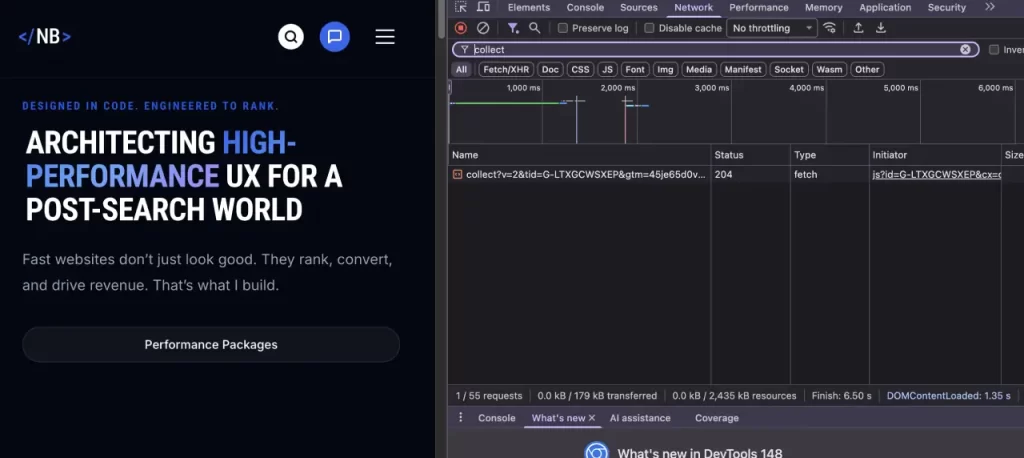
This is the ultimate proof. If I see that Network tab collect hit, my tracking is live. I’ve successfully bypassed any GA4 DebugView not working issues and restored the data flow.
Lessons from Project Phoenix

This wasn’t just a fix for me; it was an upgrade. By moving to GTM, I’ve reduced inference friction for AI crawlers, protected my site’s speed through DOM depth minimization, and built a system that can scale.
Whether you are a solo dev or managing an enterprise-level project, take my advice: get your tracking out of the plumbing and into the Command Center.
📥 Download My Full Blueprint
Want to see my internal notes on this implementation? I’ve compiled a professional PDF Guide that walks you through the deep technical configuration of GA4 custom event parameters in GTM, including how to verify your data egress like a pro.
Download the GA4-GTM Implementation Guide PDFBe the Answer AI Recommends.
Standard SEO isn’t enough in the age of AI. Optimize your data to become the primary source for the world’s most powerful Answer Engines.